Today, we’re talking about how to assemble an AR-15 lower receiver. In my opinion, assembling an AR-15 lower receiver from scratch is one of the most rewarding things a gun owner can do. It’s also one of the best ways to learn the function of your new AR-15 rifle.
The great thing about the AR platform is that anyone can learn to build and customize their rifle to their own preferences. With only a handful of basic tools and very few specialty tools, you can use this visual guide to learn exactly how to assemble an AR-15 lower receiver.
Below is a list of parts and tools you’ll need to complete this build. Please note that this visual guide is for educational purposes and you should NOT attempt to assemble an AR-15 lower receiver without having the proper tools.
Please be aware that instead of buying piece by piece, there are a number of quality kits out there like this one. Click here to see a variety of AR-15 Lower Parts Kits.
Editor’s note…here is a link to Jeremy’s TacFix video where assembles his AR-15 lower receiver. This is a great watch to familarize yourself with before you get started…or simply if you prefer a video to the step-by-step visual guide Jeremy put together for us below.
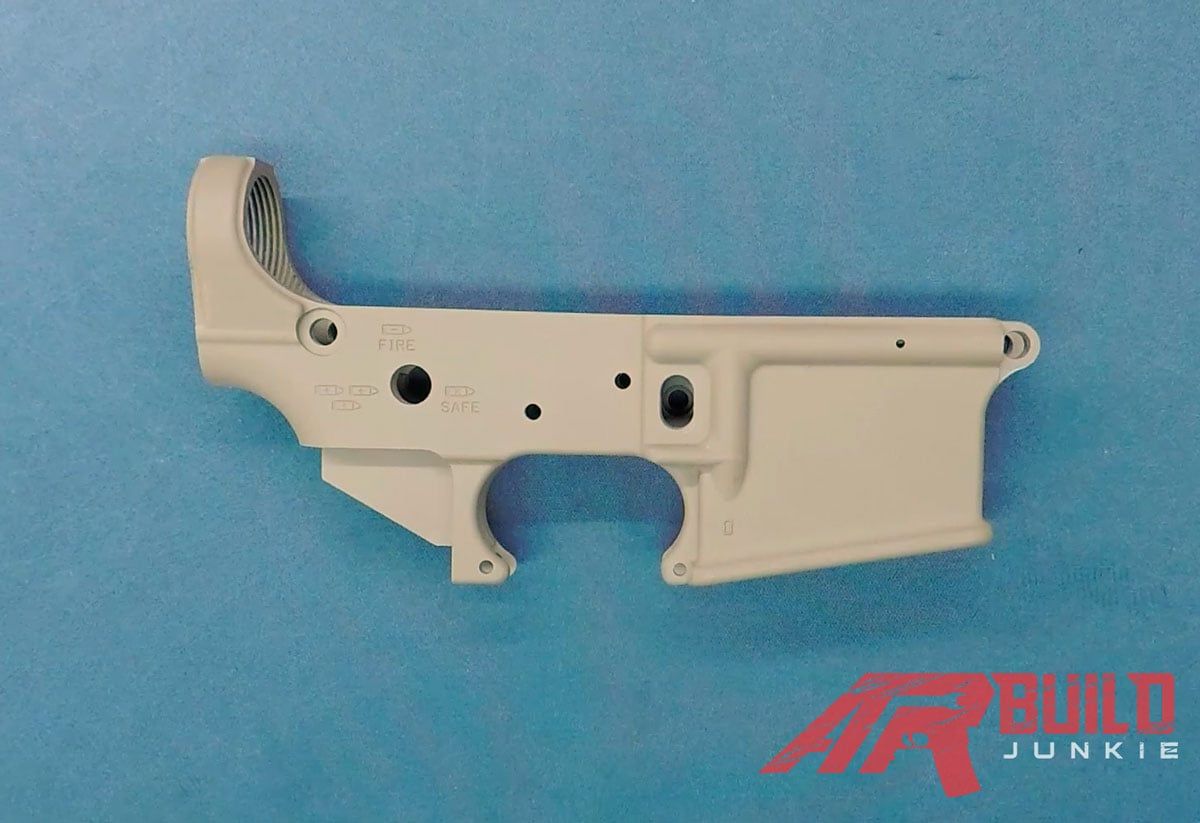
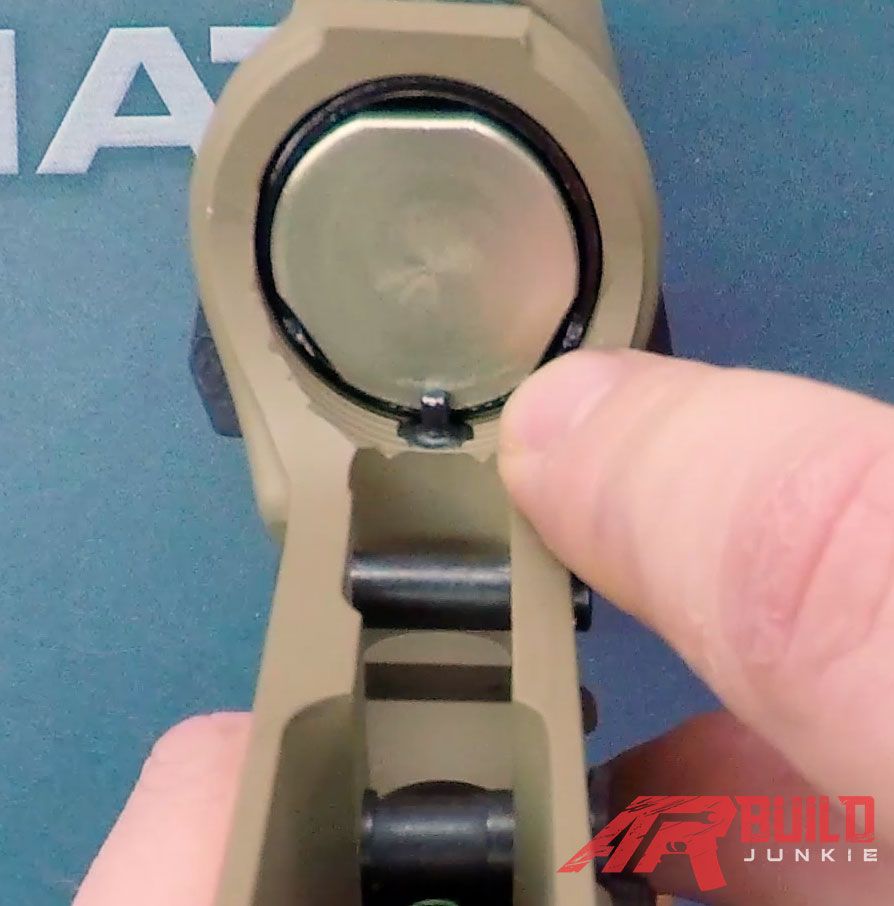
So here we have our lower receiver (fig. 1).
First thing we’re going to install on our AR-15 lower receiver is our trigger guard. For this step, you will need the trigger guard, trigger guard screw, and trigger guard roll pin.
Start by placing the trigger guard into the trigger guard slot in the bottom of the lower receiver.
Install the trigger guard screw using the specified allen wrench (typically 1/16”) in the hole at the front of the trigger guard slot next to the magazine well (fig 2).
Next, position the other end of the trigger guard into the rear opening in the trigger guard slot.
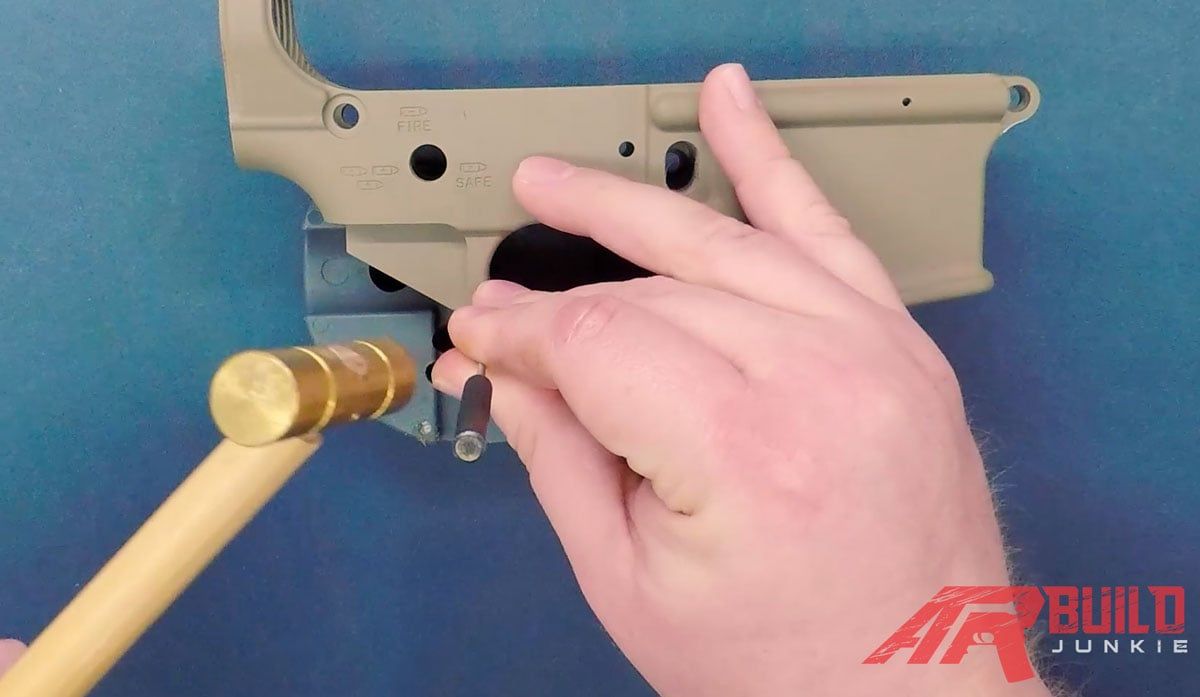
Using a roll pin punch and brass/nylon hammer, drive the trigger guard roll pin through the hole in the receiver and trigger guard to finish installing the trigger guard (fig 3).
To install the magazine catch, you will need the magazine catch, magazine catch button, and the magazine catch spring.
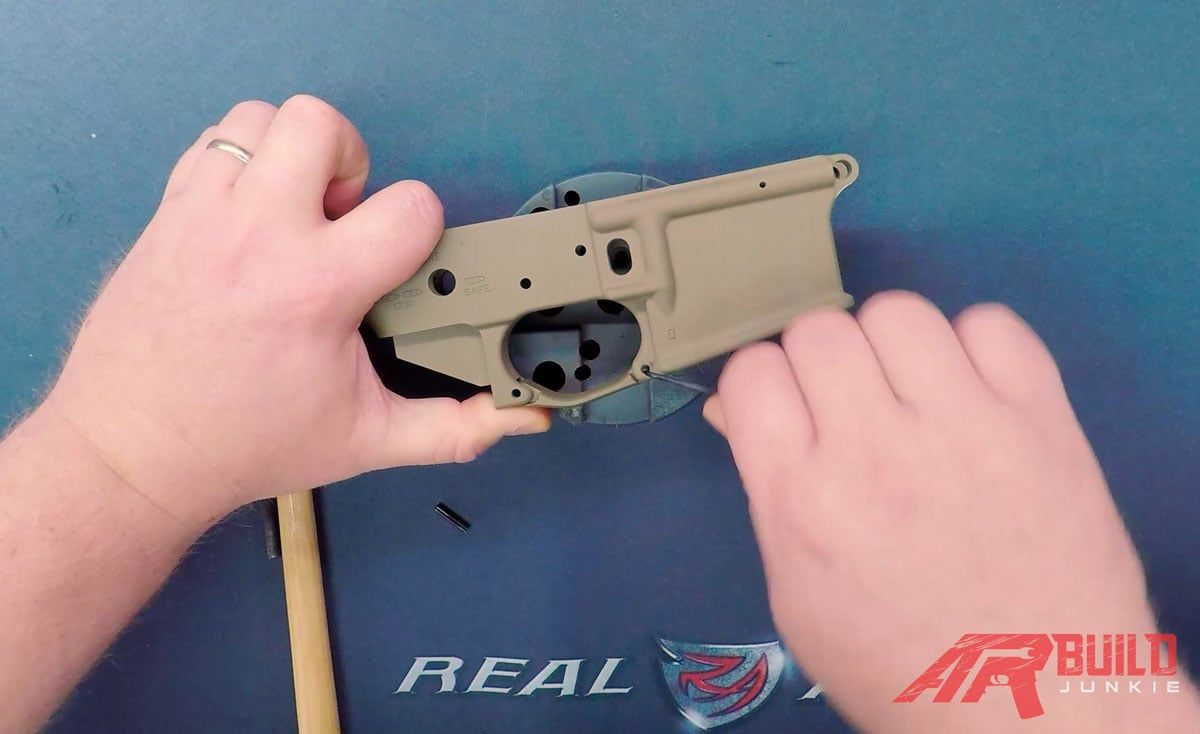
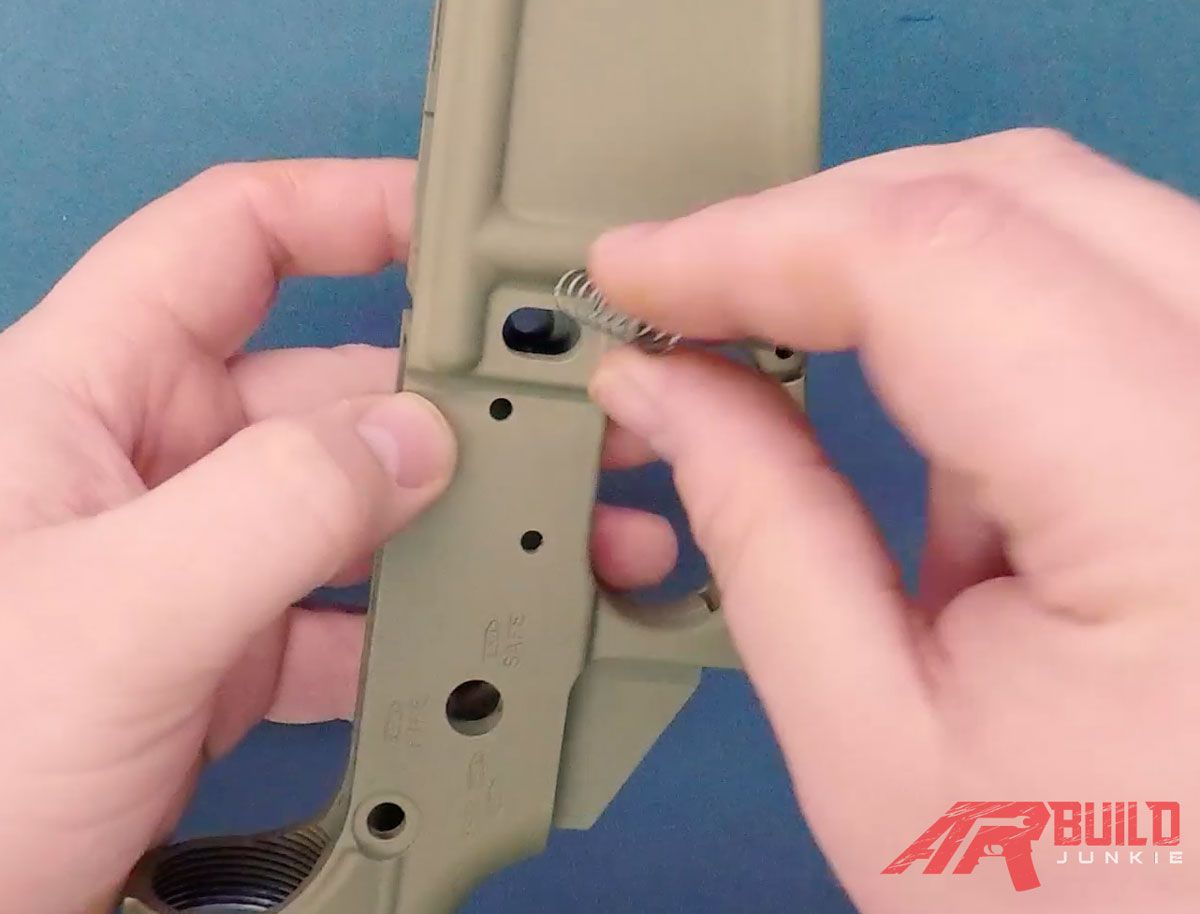
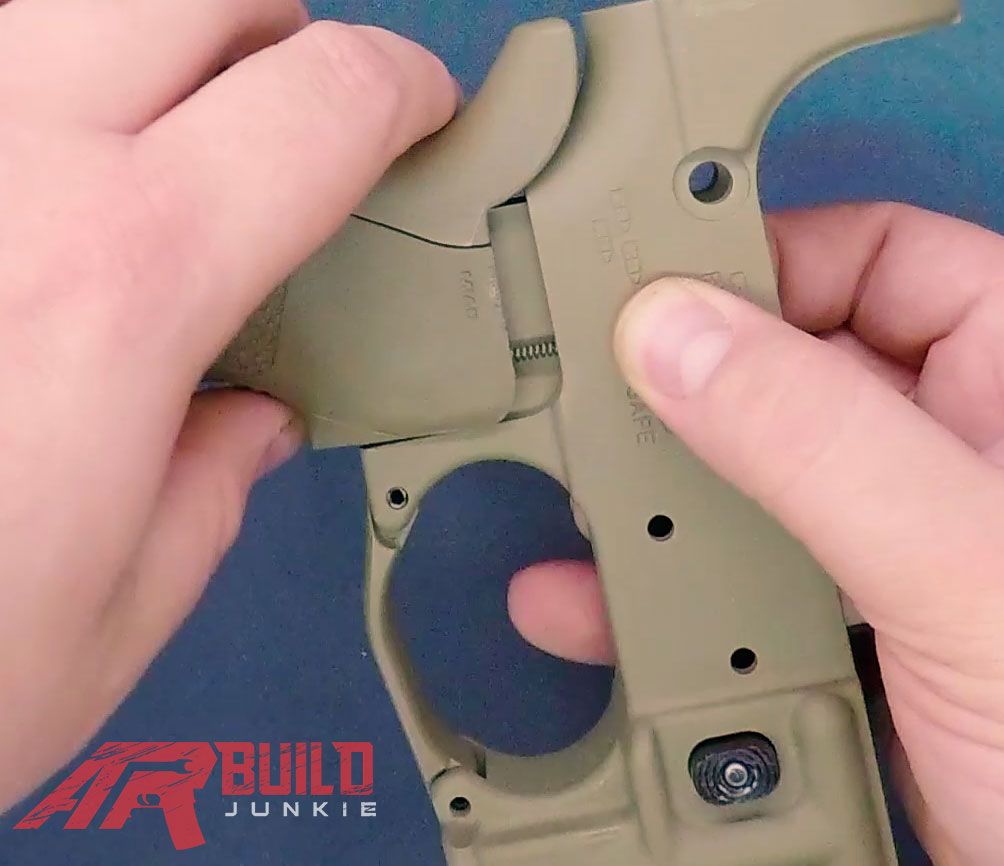
Go ahead and place the magazine catch into the long narrow slot on the left side of the receiver, located just below the recess for the bolt catch spring and buffer (fig 4).
Flip the lower receiver over, holding the magazine catch in place and slide the magazine catch spring over the post for the magazine catch, through the magazine catch button hole (fig 5).
Next, place the magazine catch button into its hole and press, putting tension on the magazine catch spring and extending the magazine catch out from the other side of the lower receiver.
Once you have this held into place, flip the receiver over and line up the post with the hole in the interior side of the magazine catch button.
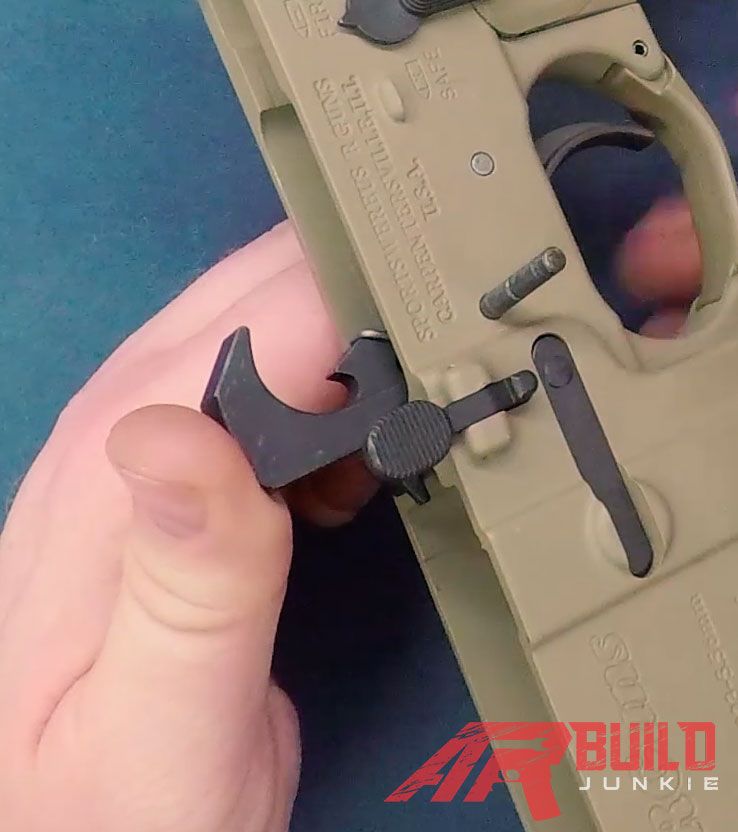
The magazine catch’s arm should be pressed out away from the side of the lower receiver. This will allow you to rotate the arm of the magazine catch clockwise to screw it into place in the back of the magazine catch button (fig 6).
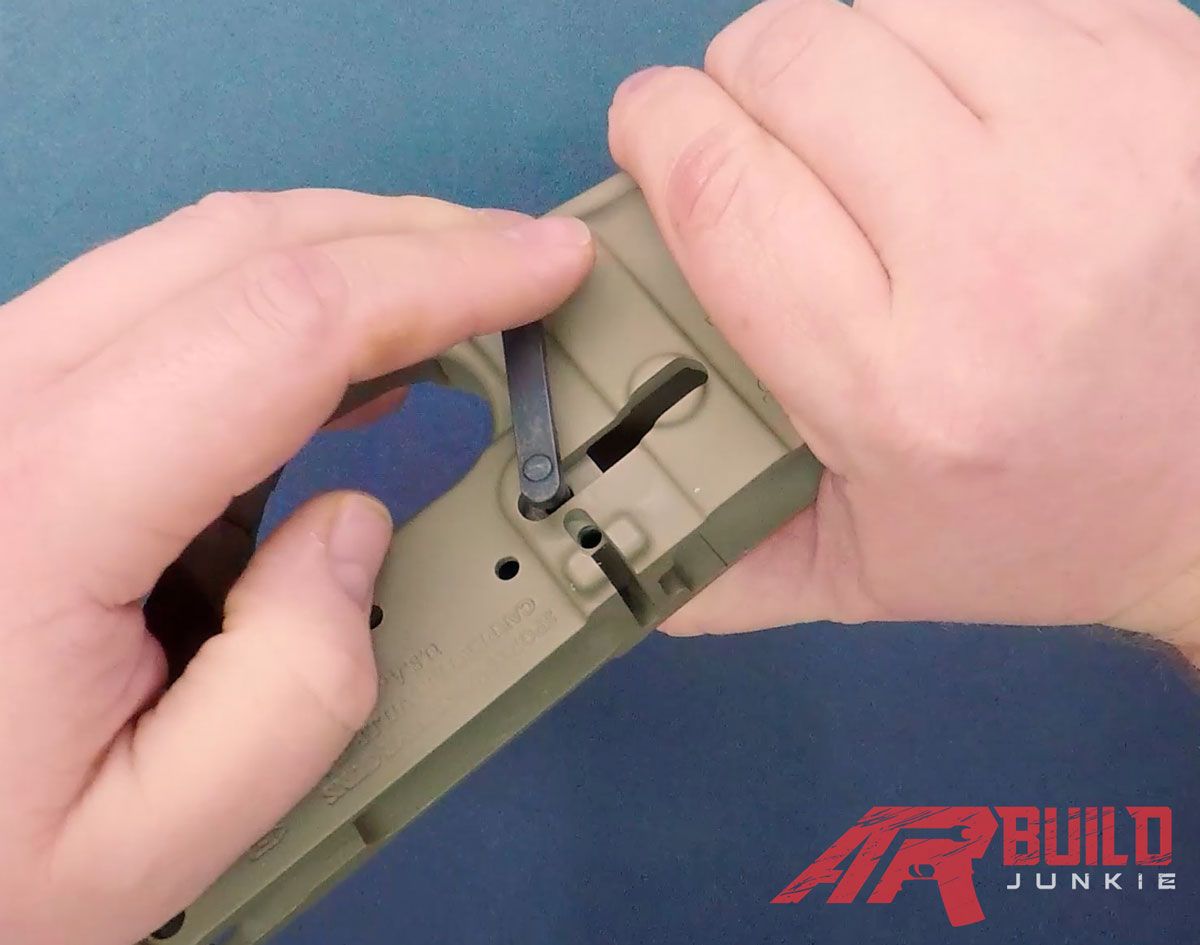
To make the job easier, grab a standard pin punch just smaller than the opening for the magazine catch button and use it to press the button all the way into the receiver (fig 7).
Continue to screw the magazine catch into place until the tip of the magazine catch’s post is just below the surface of the magazine catch button’s face.
The tip of the post and the face of the magazine catch’s arm should both be flush with their respective sides when fully installed.
To test function, insert an empty magazine into the magazine well on the receiver. Once clicked into place, give a light tug on the magazine to ensure it seats and is retained, then press the magazine catch button to check for the magazine to be released.
To install the pivot pin, start by securing the lower receiver in your vise with the front end of the receiver facing up.
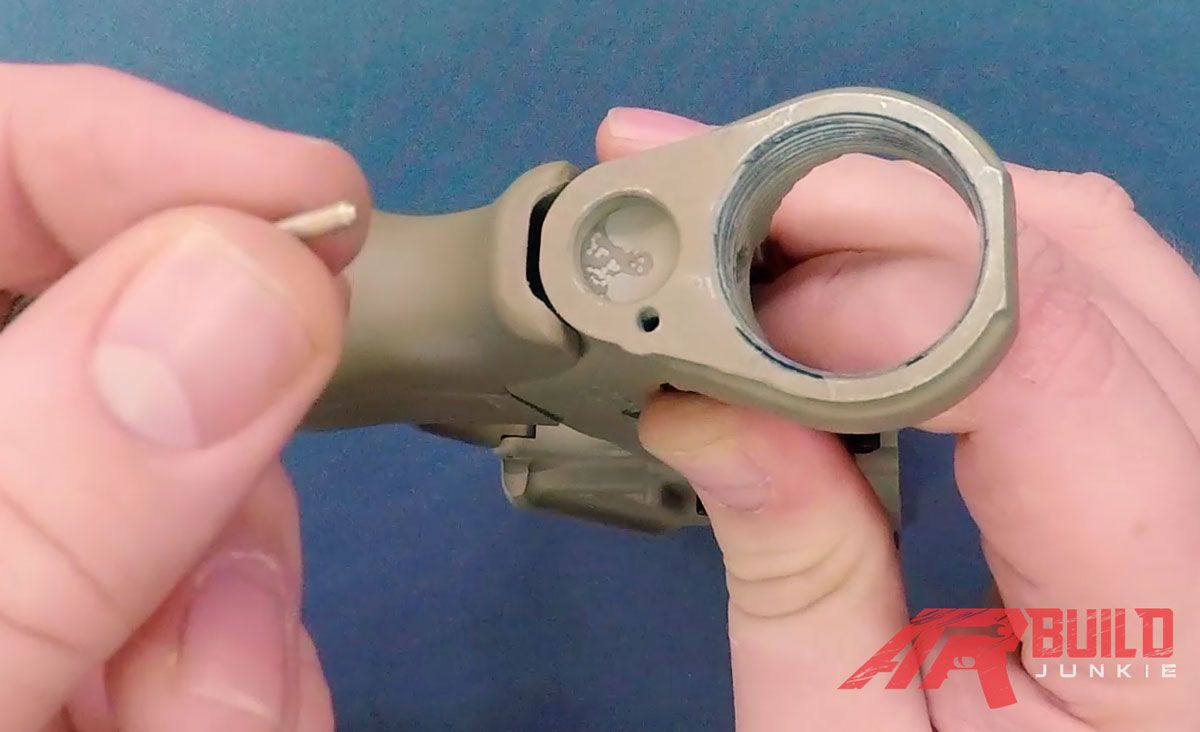
nsert the pivot detent spring into the hole on the front face of the receiver (fig 8).
Next, grip the pivot pin detent in a pair of needle nose pliers and press the detent against the spring, driving it and the spring down into the hole in the receiver.
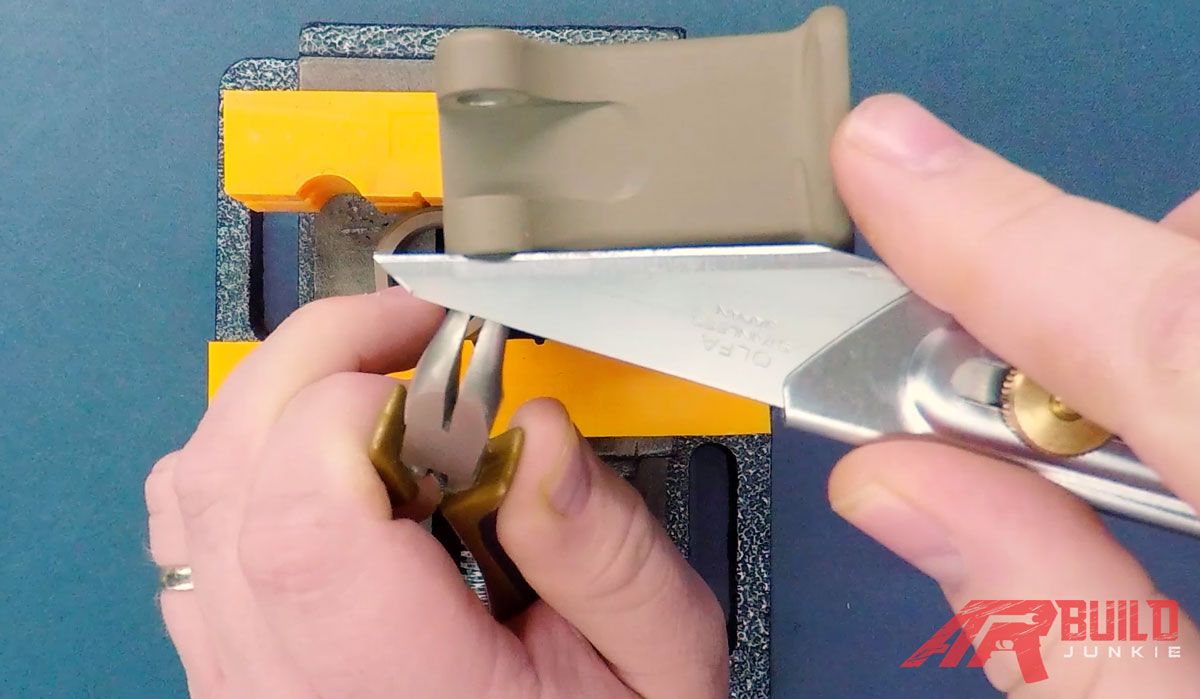
To capture the detent and spring, use a thin razor blade style knife and press the side of the blade onto the top of the detent (fig 9).
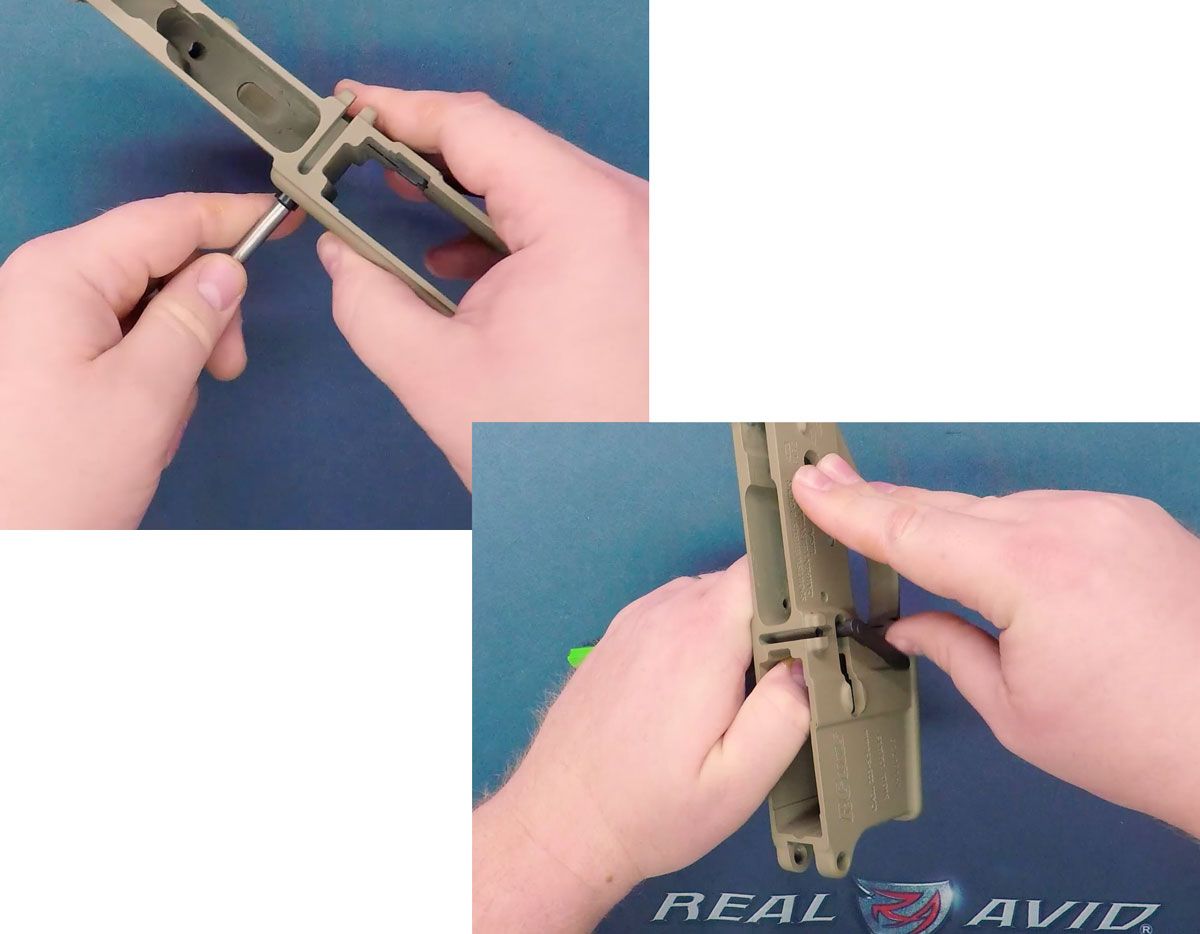
With the detent and spring held into place, slide the pivot pin over the side of the razor blade and into the hole in the receiver… (fig 10)
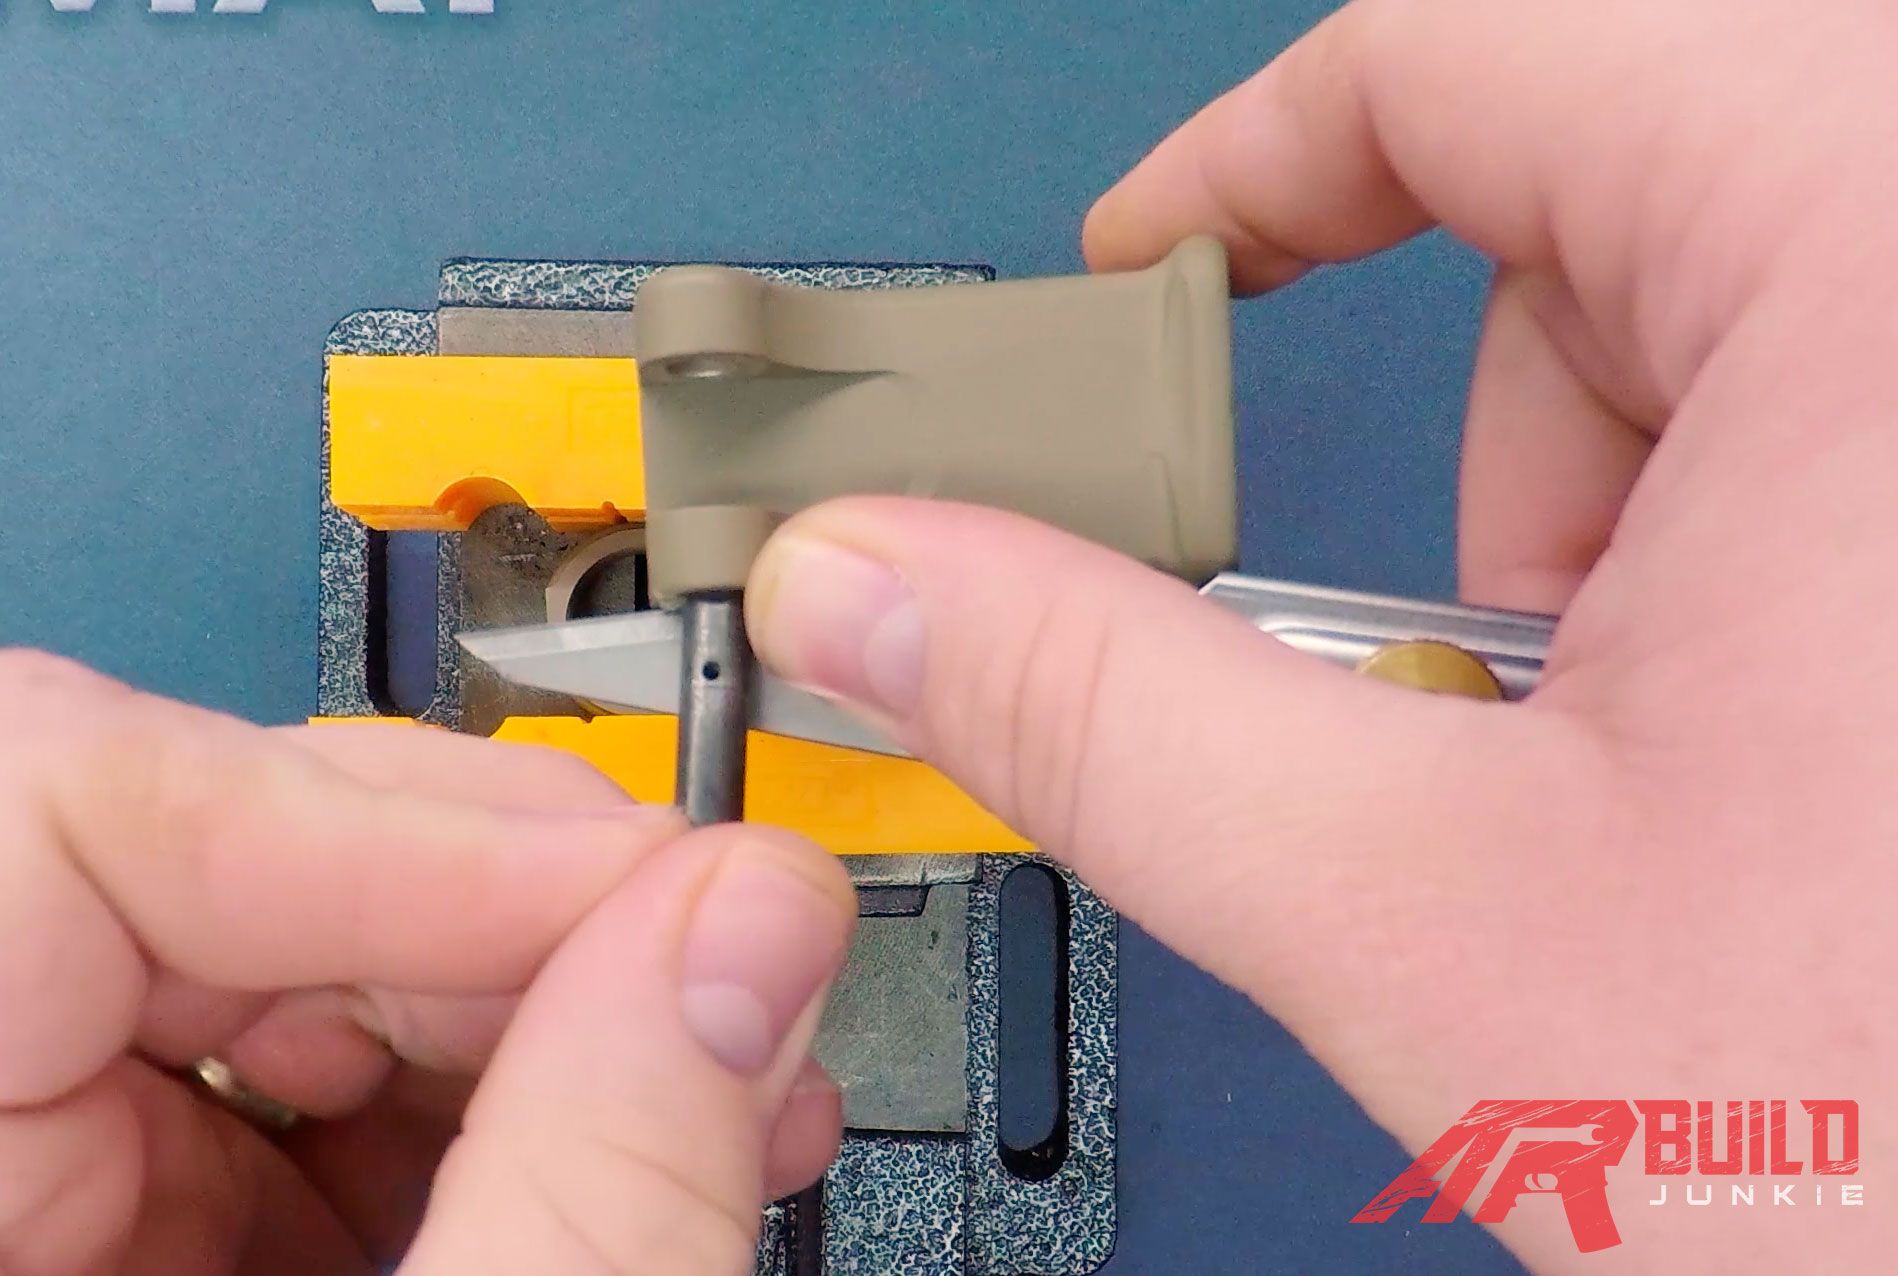
…making sure to keep the groove in the pivot pin down toward the head of the detent to capture the pin and hold it in place once fully installed.
Slide the razor blade out from underneath the pivot pin and seat the pin fully into its slot in the receiver. The flat side should protrude slightly on the other side of the receiver. The rounded head of the pivot pin should fit into the recess on the receiver, with the flattened edge of the pivot pin head oriented toward the rear of the rifle.
Pull the pin out to check that the detent captures it in place…then reset to check function.
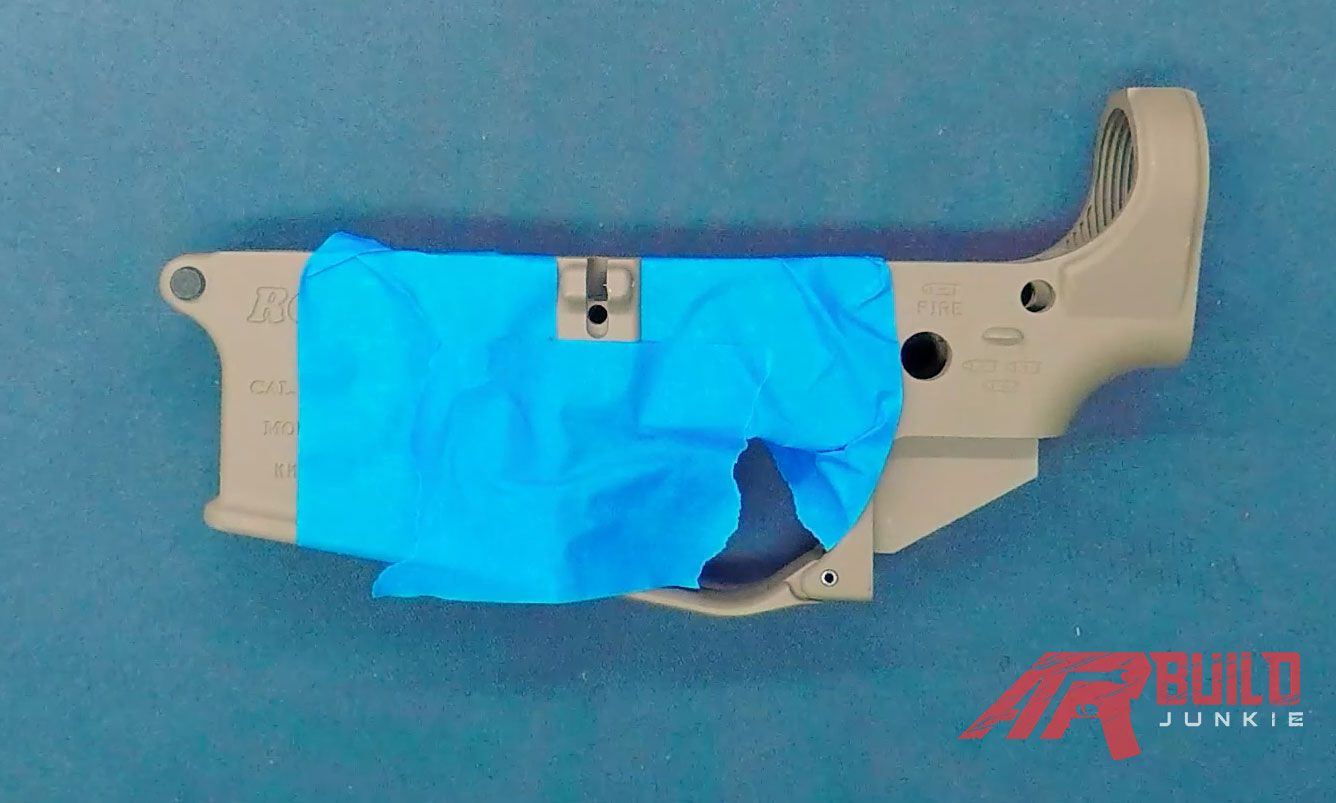
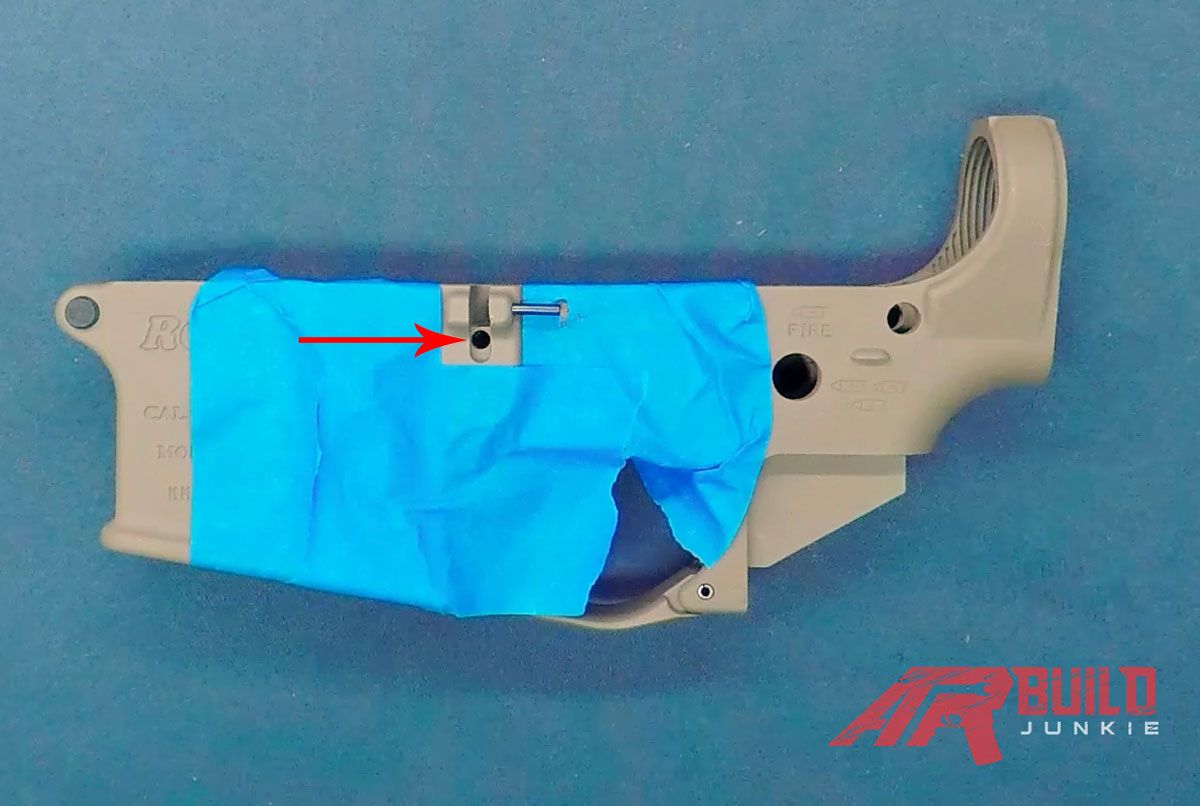
Before installing the bolt catch, I like to mask of the area around the bolt catch with painters tape. This is optional, but still a good idea to prevent marring the finish on your receiver (fig 11).
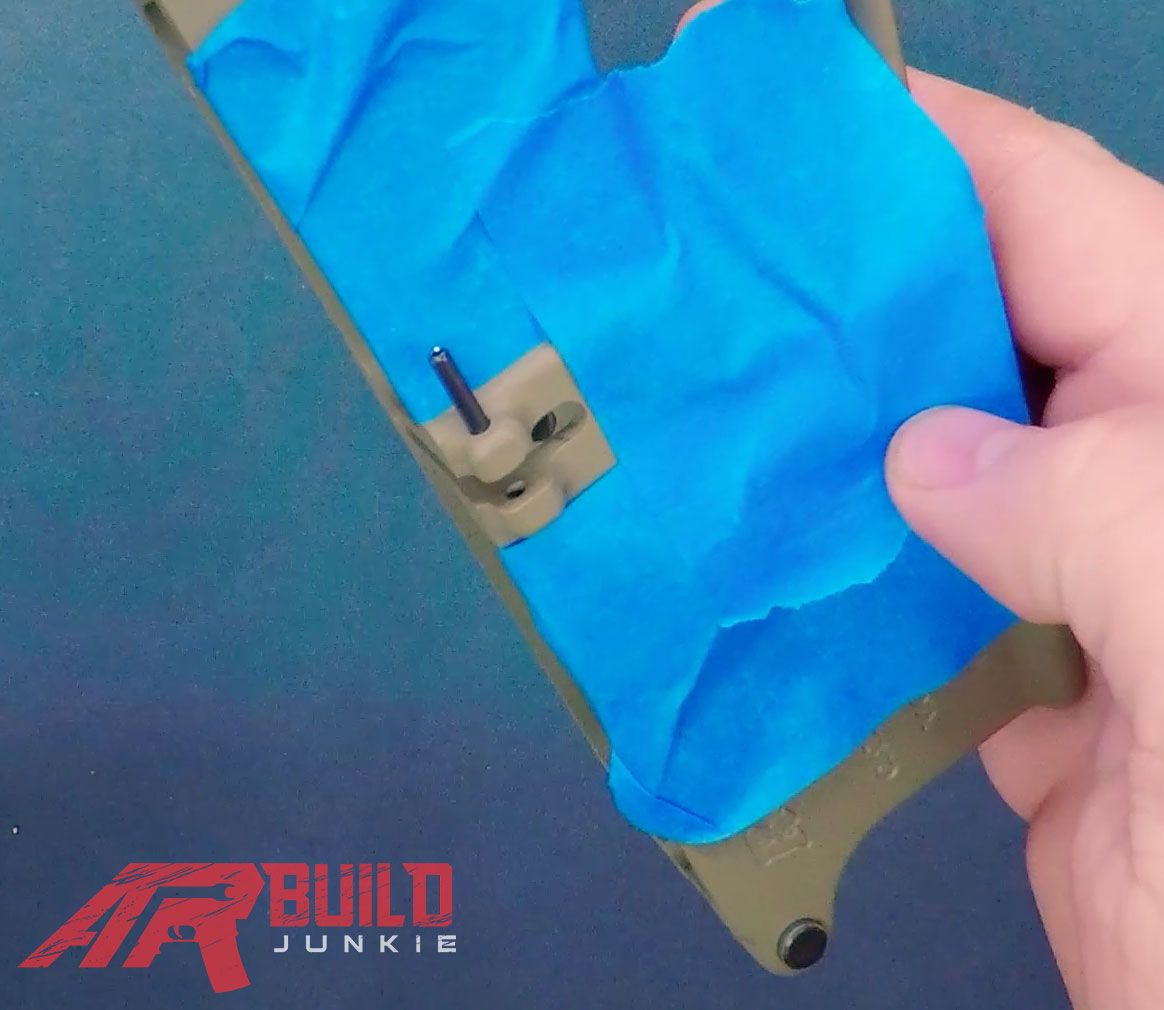
After masking the area, begin by partially driving in the bolt catch roll pin. You can drive the pin in using a roll pin punch and hammer. Only get the pin started enough to be retained in the receiver, making sure the roll pin does not extend into the slot that houses the bolt catch (fig 12).
Next, place the bolt catch spring into the hole below the roll pin on the receiver.
The bolt catch buffer also goes here. Make sure that the thin post on the buffer goes down into the hole with the rounded end on the buffer facing outward (fig 13).
Now insert the bolt catch into the recess with the ribbed paddle facing out to the left side of the receiver.
Press the bolt catch into place until the hole in the side of the bolt catch lines up with the hole in the lower receiver that we drove the roll pin through earlier.
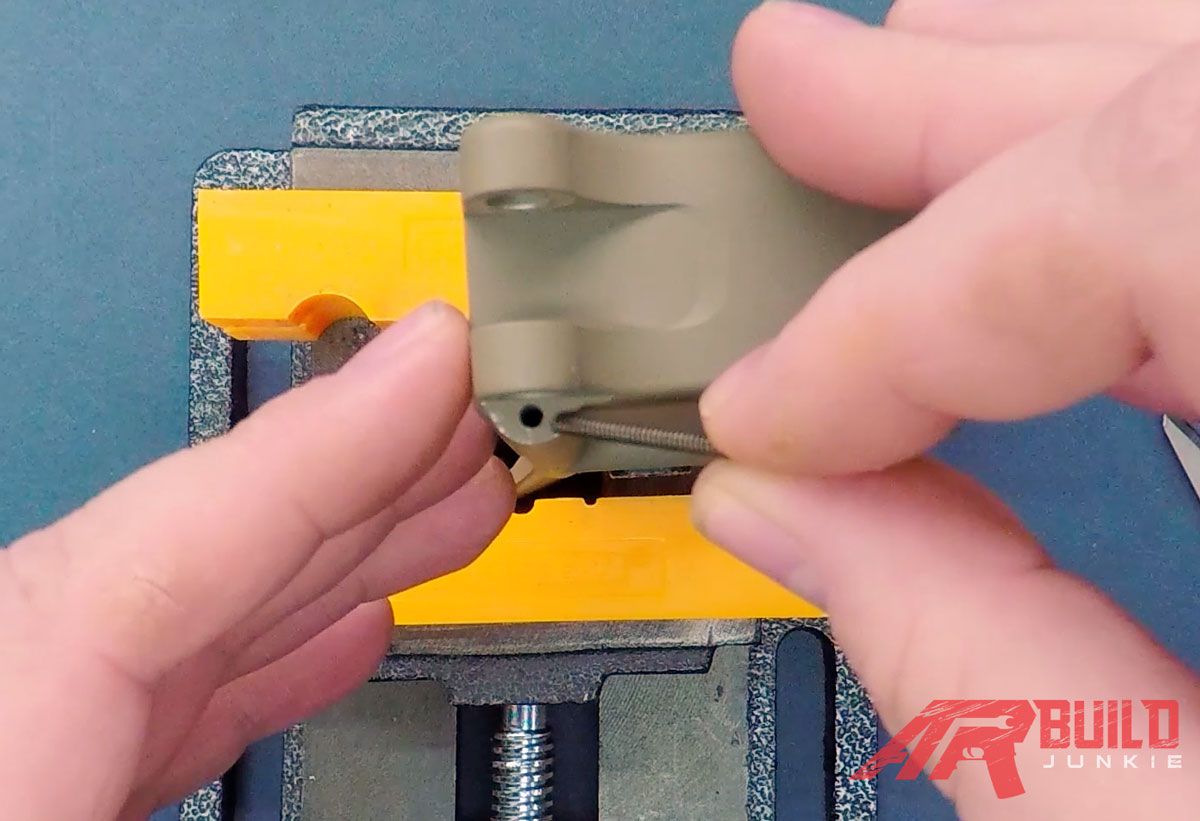
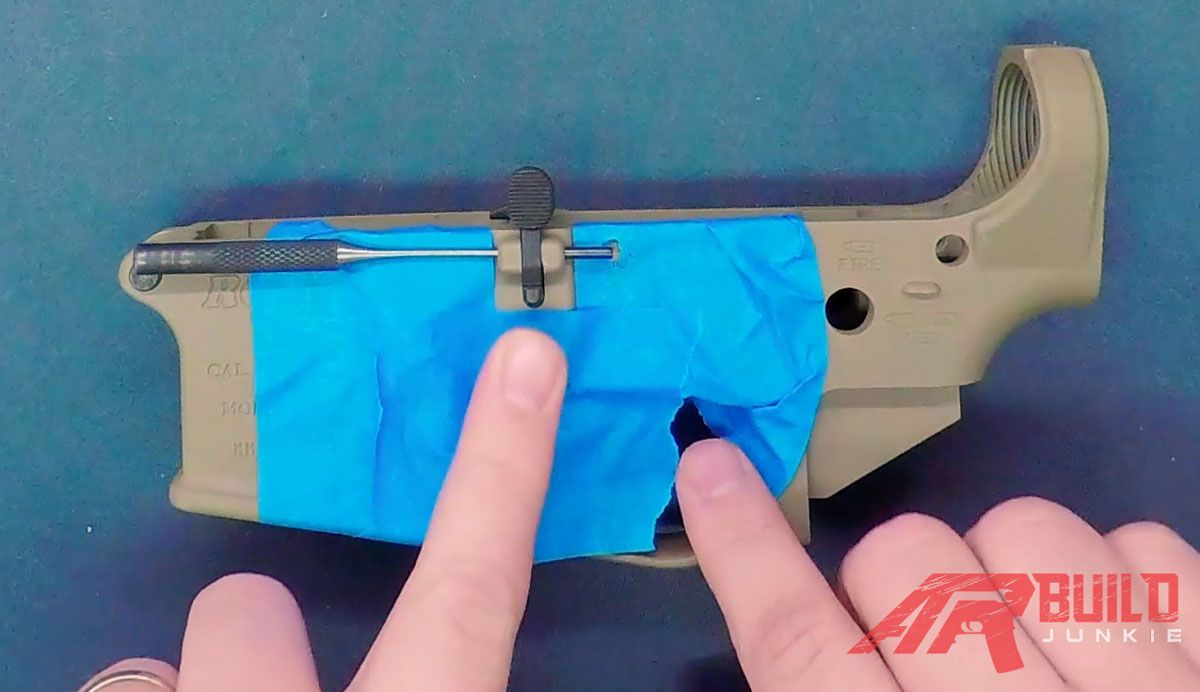
Insert a pin punch into the hole in the receiver on the opposite side of the roll pin to retain the bolt catch (fig 14).
Using a roll pin punch and brass/nylon hammer, drive the roll pin down through the hole in the bolt catch to finish.
Test function by pressing on the ribbed paddle. The paddle should spring back when pressed. Now you can remove the painters tape and move onto pistol grip installation.

Installing the trigger group starts with the fitting the hammer and trigger springs. For the hammer spring, install the spring with the coils around the posts on the side of the hammer.
The squared loop in the spring should wrap around the hammer on the hook side and the legs of the spring should extend down past the bottom of the hammer (fig 15a).
The trigger spring should be installed with the coils around the posts on the sides of the trigger. The squared loop on the spring will fit under the front protrusion on the trigger and the legs of the spring extending down away from the trigger with the feet on the end of the spring legs pointing up (fig 15b).
Next comes the disconnector and disconnector spring installation. The disconnector spring is installed into the recess in the rear of the trigger (fig 15c).
The disconnector spring has one end that is slightly wider than the other. You’ll want to make sure the wide end is placed down to lock the spring into place.
After the spring is in place, the disconnector is installed on top of the trigger (fig 16).

The square notch in the underside of the disconnector rests on top of the disconnector spring.
The trigger assembly is then placed into the lower receiver with the inside of the trigger bow facing to the front of the lower receiver.
Press down on the trigger assembly until the hole in the disconnector, trigger, and the trigger pin hole in the receiver line up.
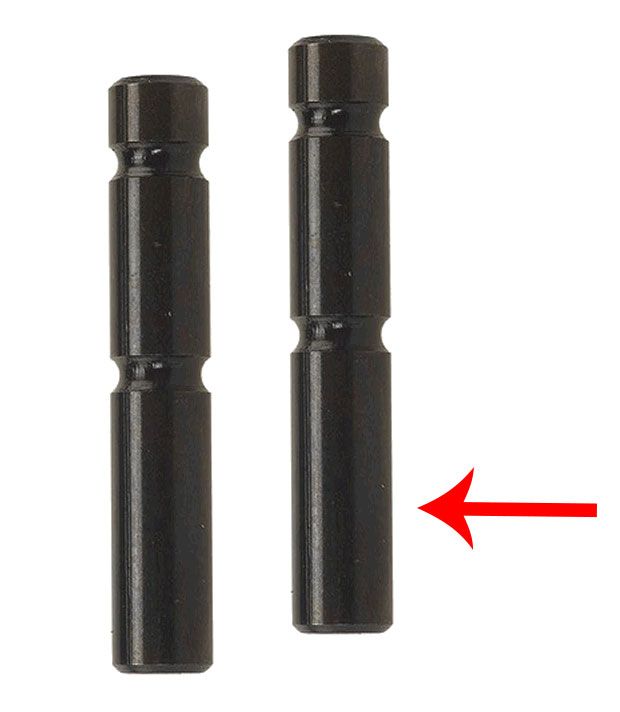
Install the trigger pin from the outside, on the left side of the receiver. You will notice the trigger and hammer pins have ringed notches in them. Both pins should be installed with the longest section of the pin going into the receiver first (fig 17).
To aid in keeping the disconnector and trigger lined up, a punch can be inserted from the right side of the receiver. Tap the pin into place with a brass/nylon hammer until it is seated and flush on both sides of the receiver.
When the trigger is installed, the trigger should spring back when pressed from within the trigger guard.
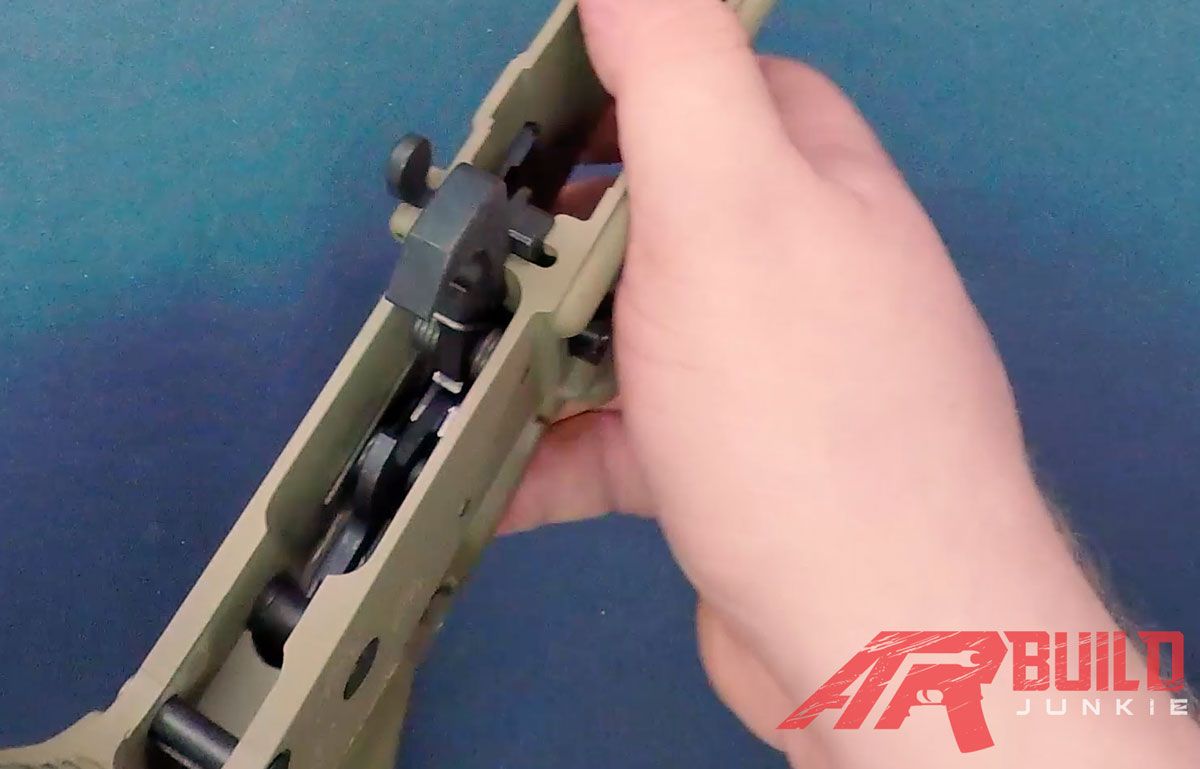
The hammer is installed with the hook side of the hammer facing the rear of the receiver, and the flat face of the hammer facing forward. When placing the hammer into the receiver the legs of the hammer spring should rest on the coils of the trigger spring so that when the hammer is pressed into place there is spring tension driving the hammer into the forward position (fig 18).
Now, press the hammer down until the hole in the side of the hammer lines up with the hammer pin hole in the side of the receiver. Then go ahead and install the hammer pin in the same fashion as the trigger pin (fig 19).
Once both the trigger and hammer have been installed, test function by pulling the top of the hammer down and to the rear to lock it into the ready to fire position. Brace the face of the hammer so that it does not strike the inside of the receiver with its full force. Test function a few times to ensure proper installation.
Please note, there are other sorts of triggers you may wish to consider for your build.
Should you have the proper tools, you might be interested in cleaning up your mil-spec trigger. Click here to learn more about what is involved.
Insert the selector spring into the hold in the top of the pistol grip. Set the pistol grip and spring aside (fig 21).
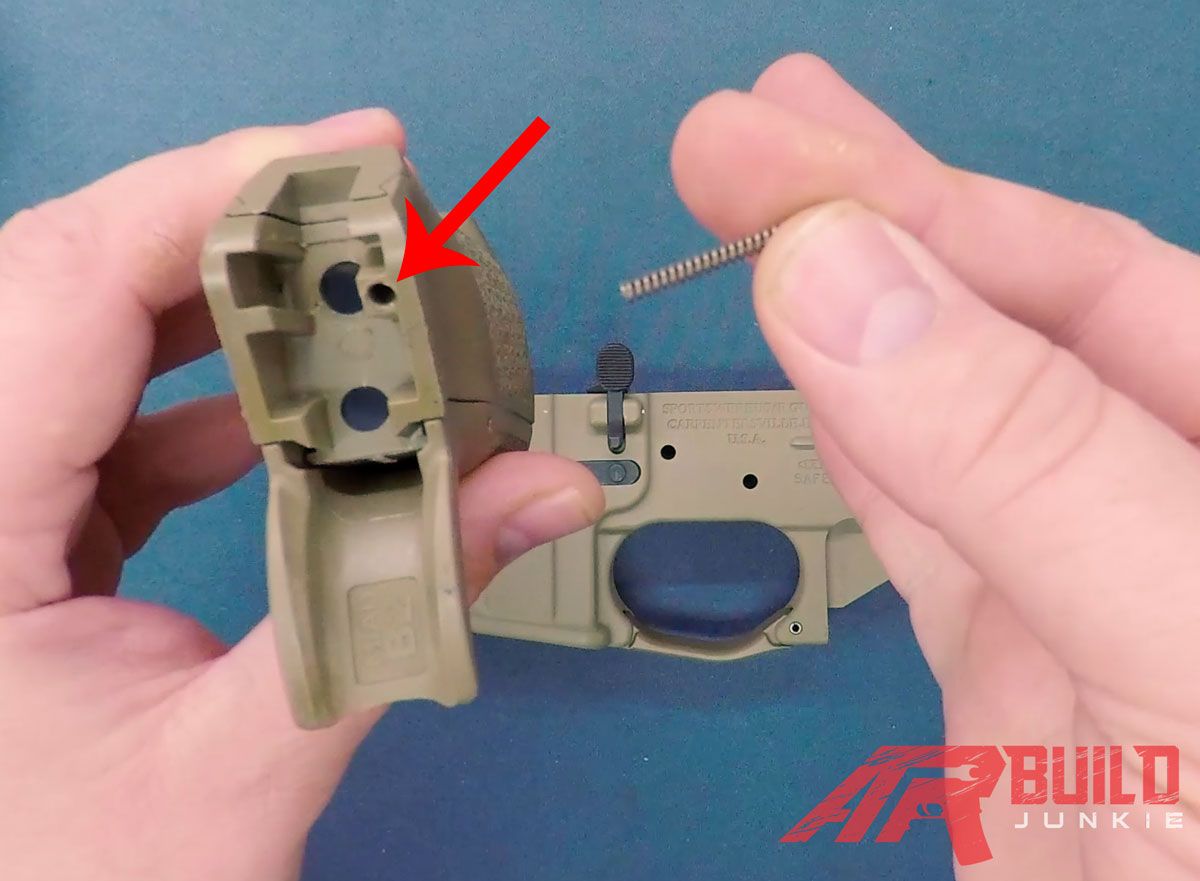
Next, take your lower receiver and flip it upside down.
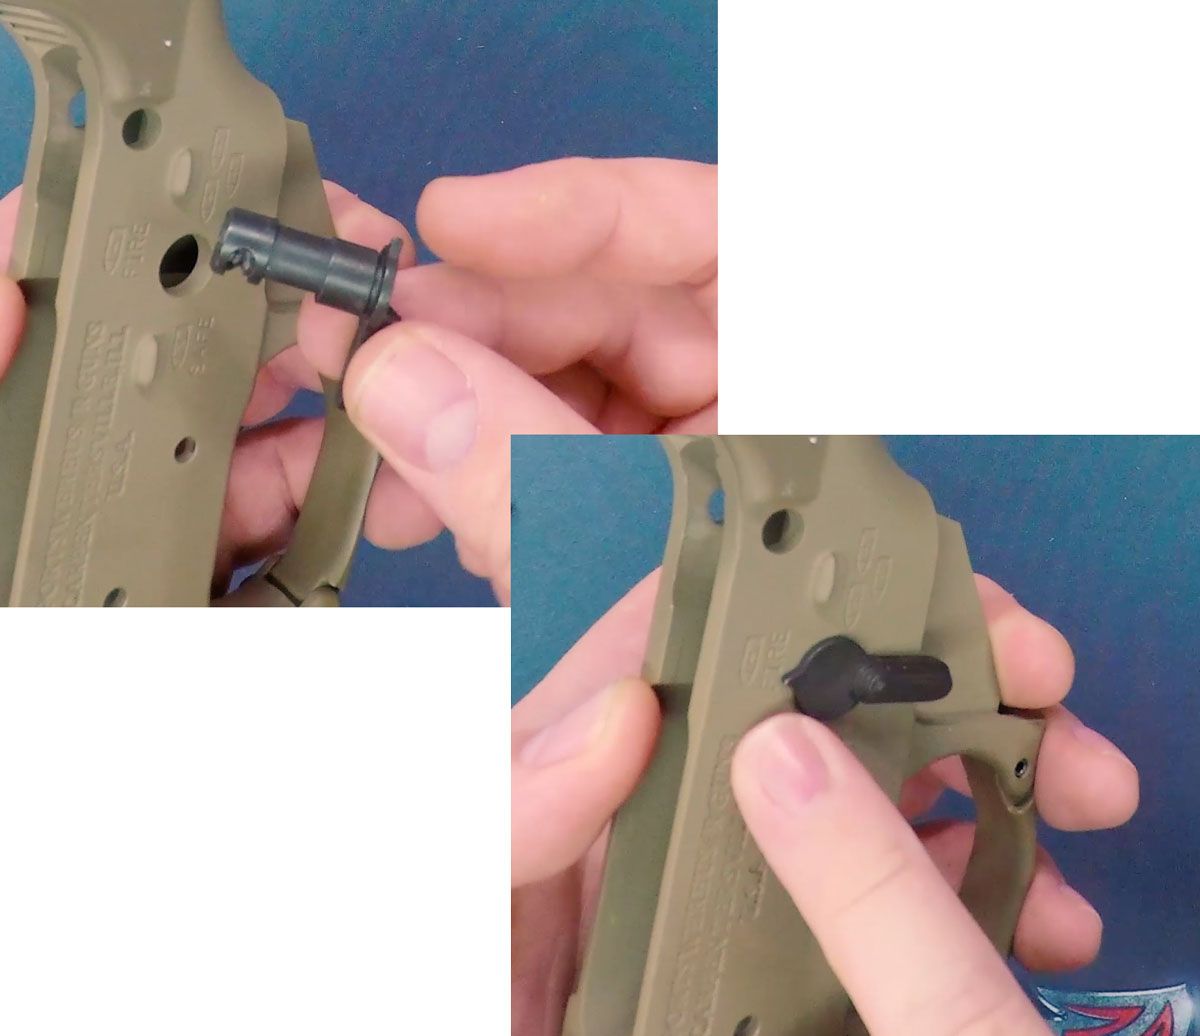
Insert the selector detent into the hole in the underside of the lower receiver on the right side of the pistol grip area. When properly installed, the detent should have the pointed end oriented toward the opening for the selector switch (fig 22).
Now, insert the selector switch into the selector switch hole on the left side of the lower receiver. The tip of the selector should be pointing to the firing position (fig 23).
Holding the selector in place, press the pistol grip into place making sure the selector spring lines up with the selector detent hole.
Be sure not to bend/kink the selector spring, as this can cause sloppy tension on the selector detent (fig 24).
Finally, invert the lower receiver assembly and install the pistol grip screw (with the pistol grip lock washer in place around the screw post).
Now that the pistol grip is in place, test for function on the selector switch. When changing from safe to fire positions there should be a felt click from the selector detent.
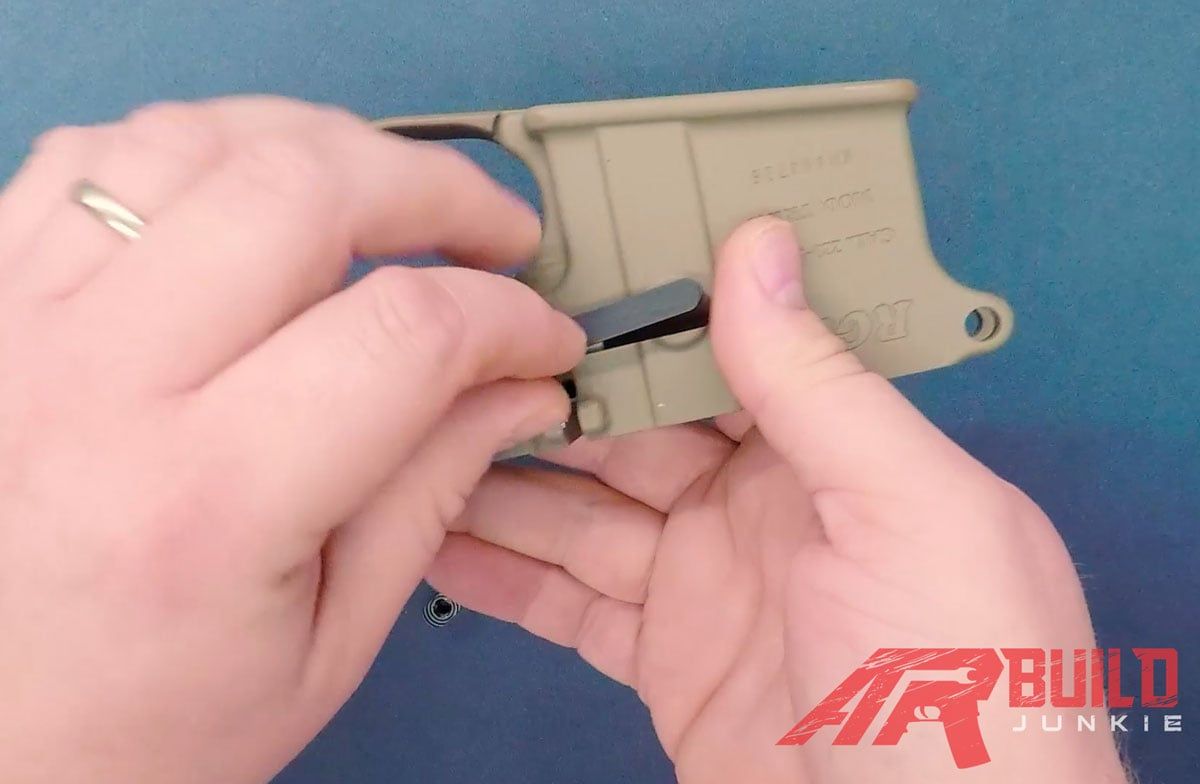
To install the takedown pin, insert the pin into the takedown pin slot at the back of the receiver… (fig 25)
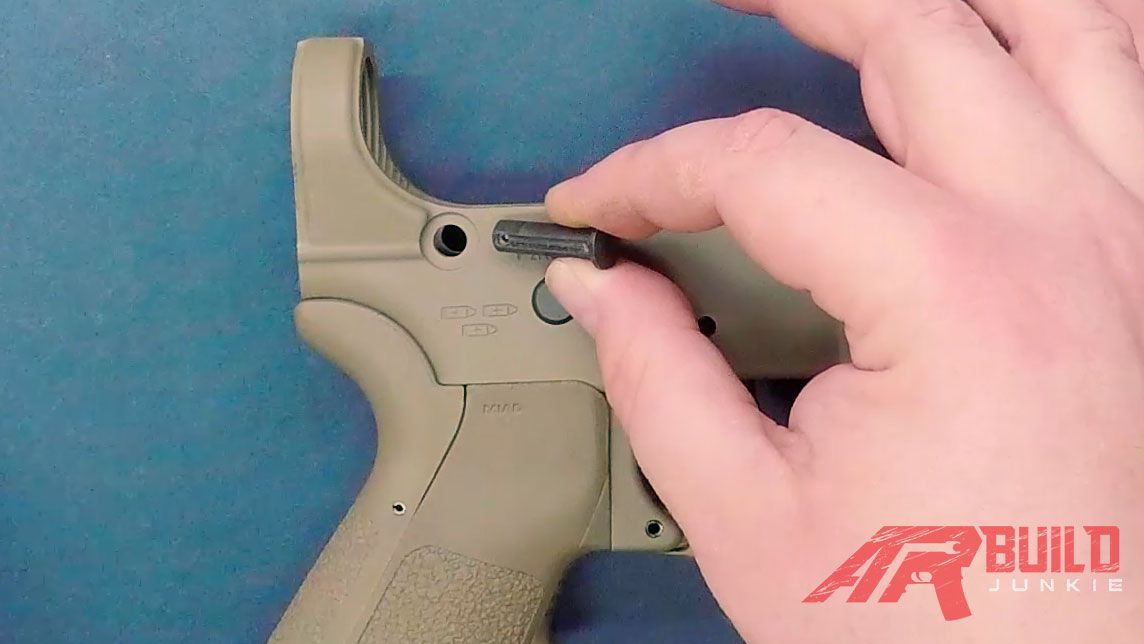
…with the channel notch in the pin positioned toward the rear of the receiver. Next, drop the takedown pin detent and then the takedown pin spring into the hole in the rear face of the receiver (fig 26).
With the castle nut and end plate pre-threaded onto the buffer tube (the castle nut should be oriented so that the larger notches on the edge of the castle nut face the rear of the buffer tube and the smaller notches that will be used for staking the castle nut will face the front of the receiver), begin screwing the buffer tube into the rear of the receiver (fig 27).
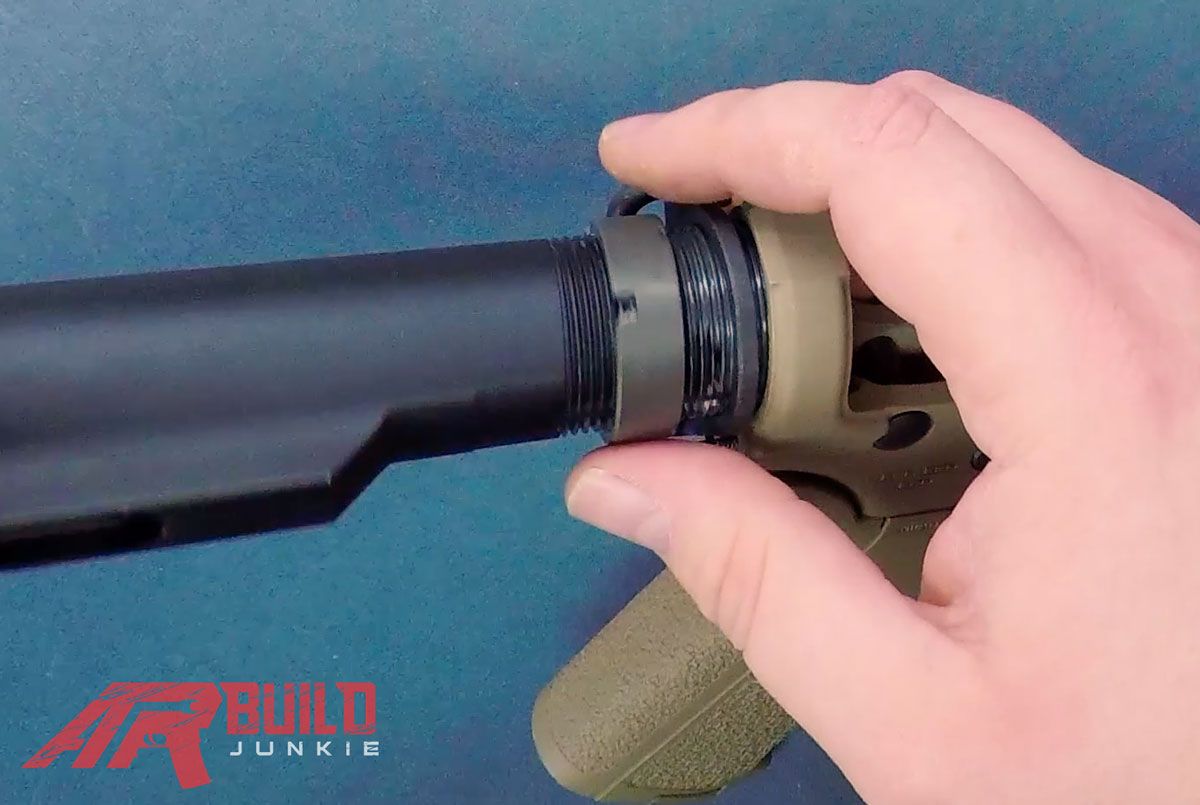
Screw in the buffer tube until the end plate captures and compresses the takedown pin spring and thread the castle nut down to secure the end plate in place.
Stop threading in the buffer tube when the front lip of the tube is just less than flush with the hole in top of the buffer area on the receiver (fig 28).
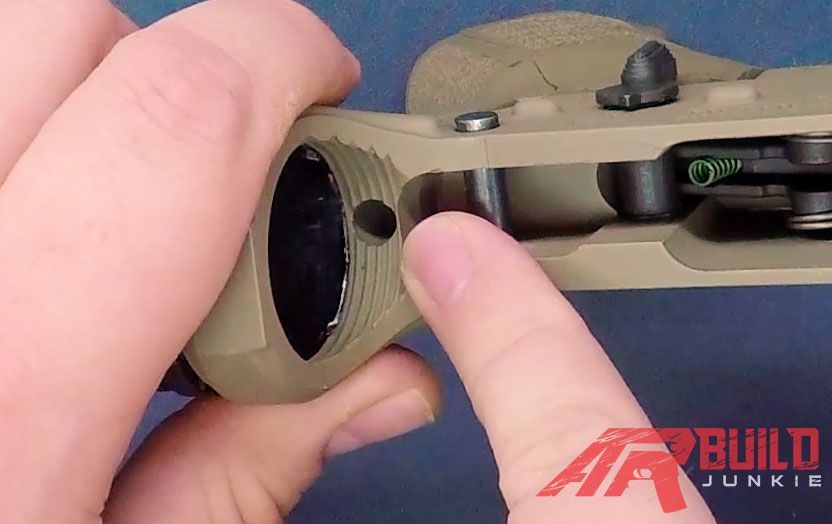
At this point, insert the buffer retainer spring, then buffer retainer into this hole in the top of the receiver.
Press the buffer retainer down into the hole with your fingernail, or a small flat bladed screwdriver, then finish threading in the buffer tube until the lip of the buffer tube covers the outer rear edge of the buffer retainer to hold it in place (fig 29).
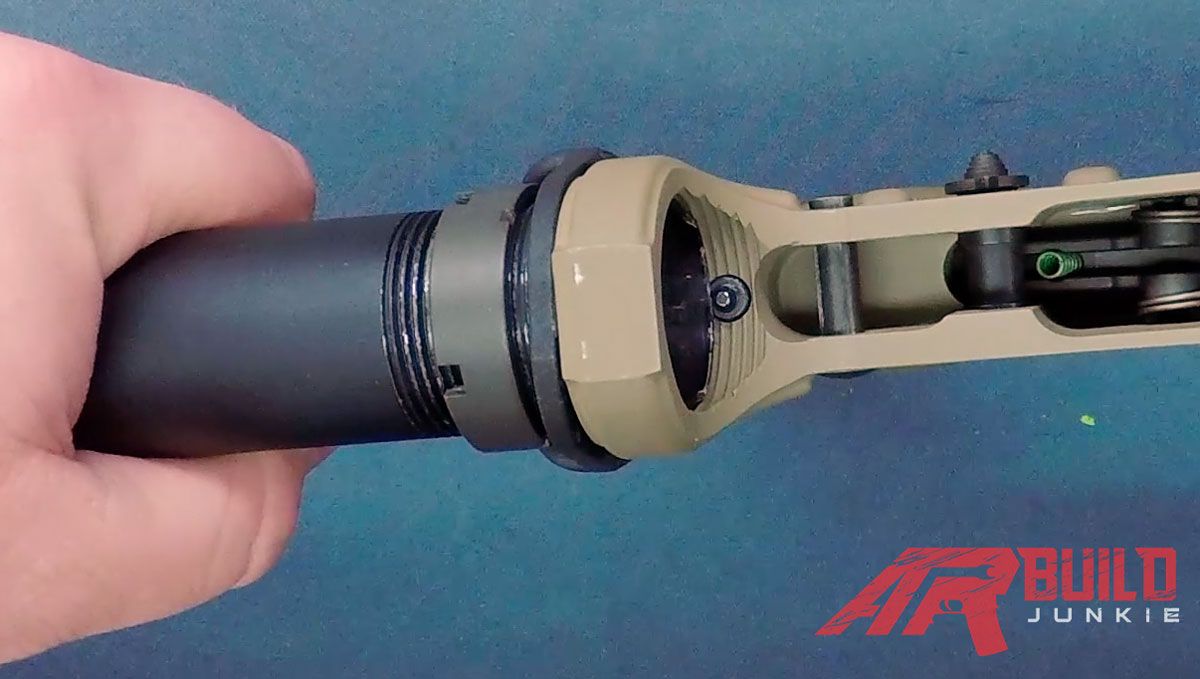
When installed properly, the holes in the underside of the buffer tube that interact with the stock should be in line with the rest of the lower receiver.
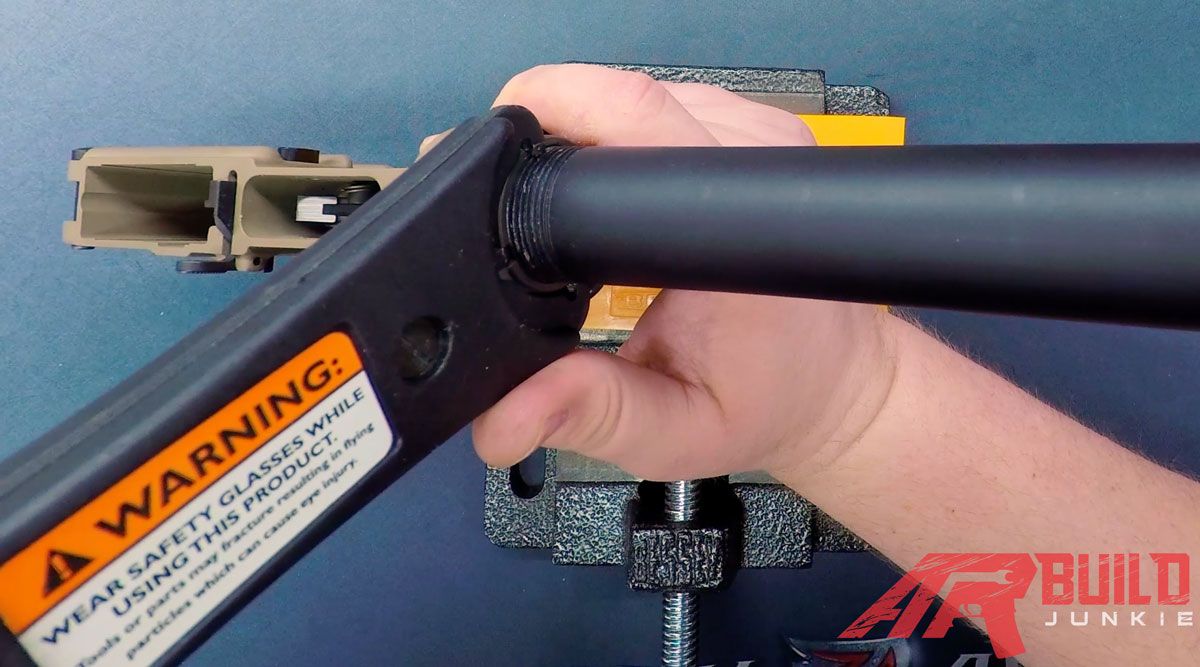
To finish the installation of the buffer tube, place the receiver into the vise and tighten the castle nut to 40 ft/lbs of torque using an AR armorer’s tool (fig 30).
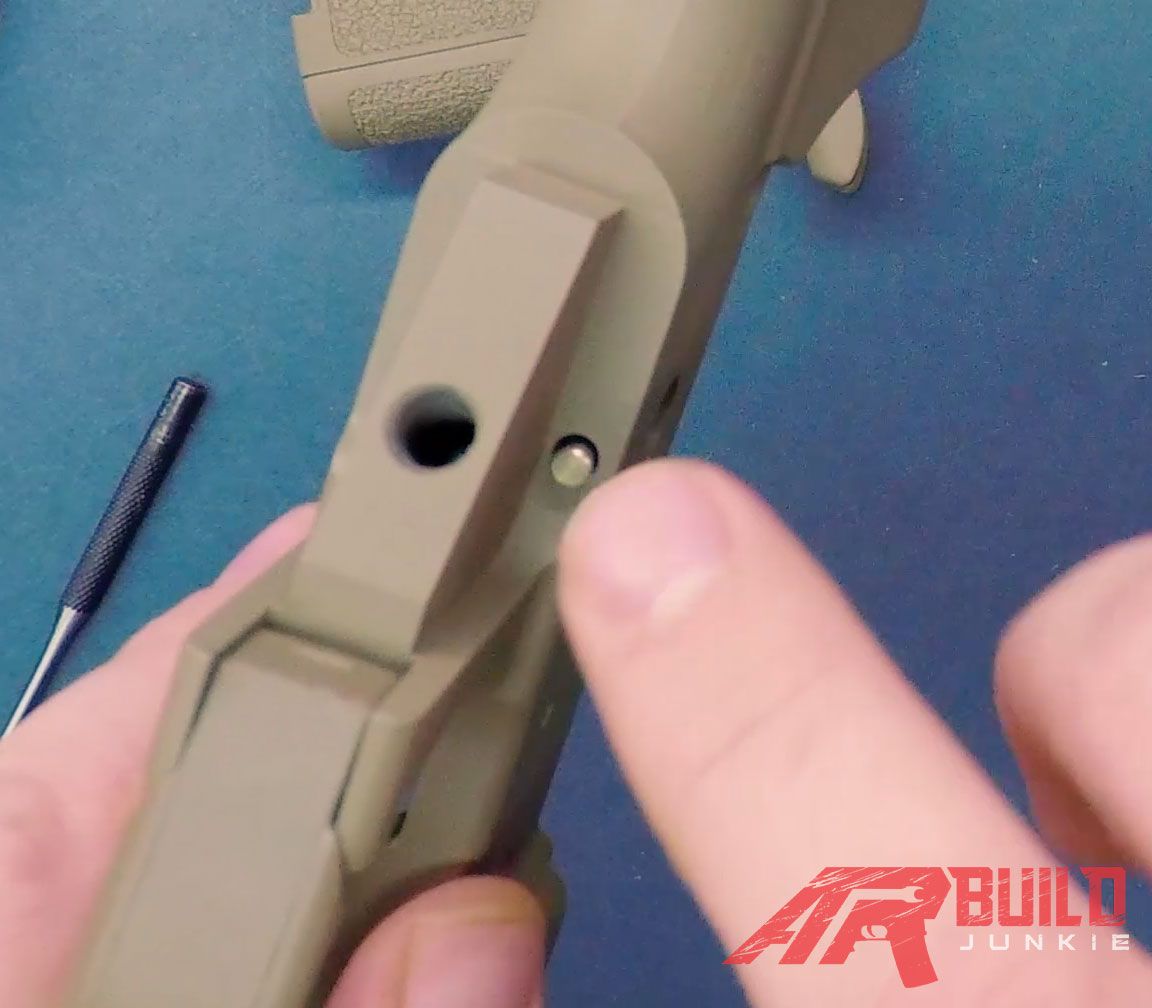
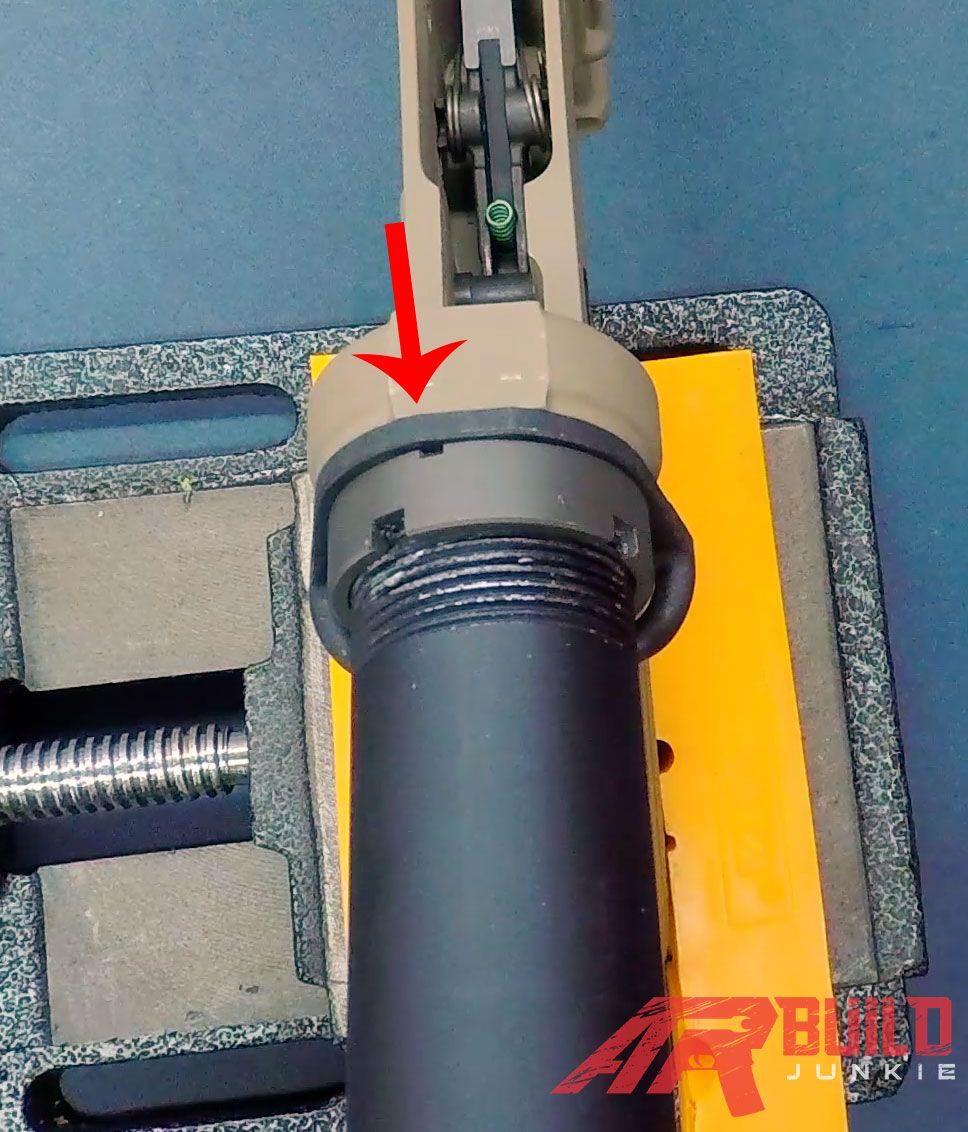
To stake the castle nut, we will be using either a spring-loaded center punch or a standard center punch and a hammer.
Place the tip of the punch onto the lower receiver end plate at a point on the top of the endplate that is in line with a small staking notch on the castle nut (fig 31).
Strike the punch while held straight up and down to create a dimple in the end plate. After creating your dimple, angle the punch to approx 45 degrees with the top of the punch angled toward the front of the receiver.
Now, strike the end plate to push metal into the staking notch in the castle nut to prevent the castle nut from backing out.
As an alternative to staking, blue Loctite can be used on the inside of the castle nut. Staking is considered the standard method to secure the castle nut in place. However, if you prefer not to mar your end plate/paint job, or if you like to switch out your buffer tubes with specialty ones to accommodate specialty buttstocks or pistol braces, then keeping the castle nut unstaked may be the way to go.
Keep in mind that blue Loctite is less secure than proper staking, so you will need to consider the tradeoff between versatility and security.
After the buffer tube is fully installed, you can install an AR buttstock according to the manufacturer’s instructions.
Into the buffer tube, you will then insert the buffer and buffer spring with the wide flat metal face of the butter toward the front of the receiver (fig 32).

As you press the buffer into position behind the post on the buffer retainer you will notice there are both flat and round sections around the outer edge of the buffer head.
Orient one of the flat sections down to pass over the buffer retainer post. Once the buffer head has fully cleared the post on the buffer retainer rotate the head of the buffer so that a rounded section of the buffer head is positioned down and will remain retained by the buffer retainer (fig 33).
Now that we have the lower receiver fully assembled, go ahead and pull out the takedown and pivot pins and attach the fully assembled upper receiver to the lower. P ress the takedown and pivot pins in to lock the upper and lower receivers together.
Now that we have our rifle complete, we are ready to run safety checks. We want to ensure the safety selector will allow the trigger to drop the hammer in the fire position and will prevent this when in the safe position.
After completing all our safety check we are ready to take our new firearm to the range to give it a full field test.
Jeremy Bedsaul is an avid writer, video editor, & shooter. His oldest shooting memories go back to shooting 22s with his father and grandfather out in rural central Missouri. Jeremy is a husband and father of two girls who can’t wait until they are old enough for him to share his passion for firearms with. Outside of firearms, Jeremy’s interests include RPG gaming, philosophy, arguing about politics, and keeping up with the latest tech and gadgets. Jeremy runs the blog over at TacFix.com where he posts reviews, build videos, tips & tricks related to many pistol and rifle platforms.
Did you find this article useful?
Let the author know with a 5 star rating!
Average rating 5 / 5. Vote count: 97
No votes so far! Your rating will help us continue to provide valuable and interesting content.
Since you found this post useful.
Follow us on social for first dibs on brand new content!
We are sorry that this post was not useful for you!
Let us improve this post!
Tell us how we can improve this post?